


In the world of processamento de agregados, proper sand washer installation and startup procedures can mean the difference between smooth operations and costly downtime. Whether you’re setting up a new production line or maintaining existing equipment, understanding these critical processes ensures optimal washing efficiency while extending equipment lifespan. This comprehensive guide covers professional installation practices and a foolproof pre-start inspection checklist—developed from industry best practices—to help you avoid common pitfalls and maximize your sand washer’s performance.
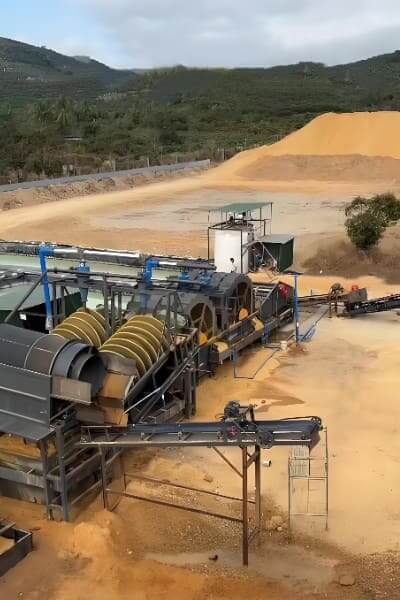
Sand washers are essential equipment in sand and gravel production, and are mainly divided into wheel-type and spiral-type. Below, we will introduce these two main types of máquinas de lavar areia.
Wheel Type Sand Washers & Spiral Type Sand Washing Machine
1. Wheel Sand Washer (Bucket Wheel Sand Washer)
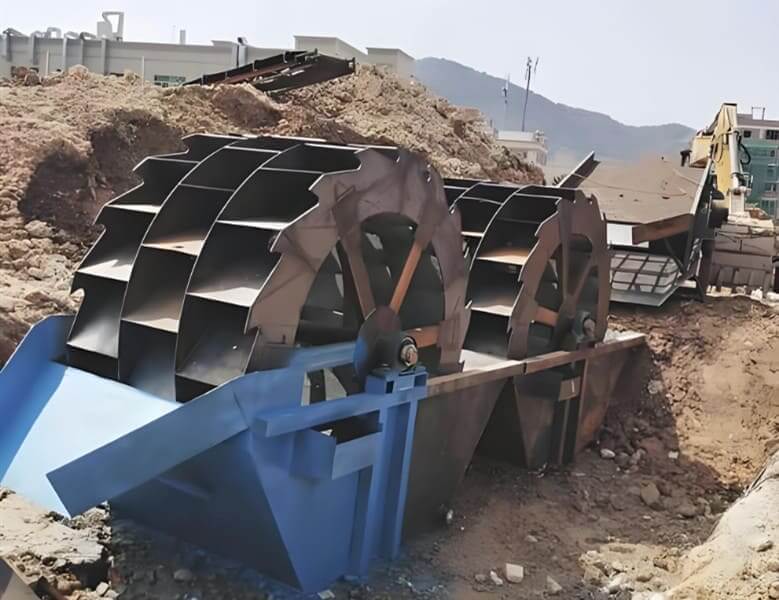
How it Works: Water and sand are fed into a rotating wheel with buckets that scoop, rinse, and discharge clean sand while impurities are washed away.
Características
- Low water consumption
- Simple structure, easy maintenance
- Moderate washing efficiency (best for fine to medium sand)
Aplicações
- Artificial sand production
- Small to medium-sized sand washing plants
2. Spiral Sand Washer
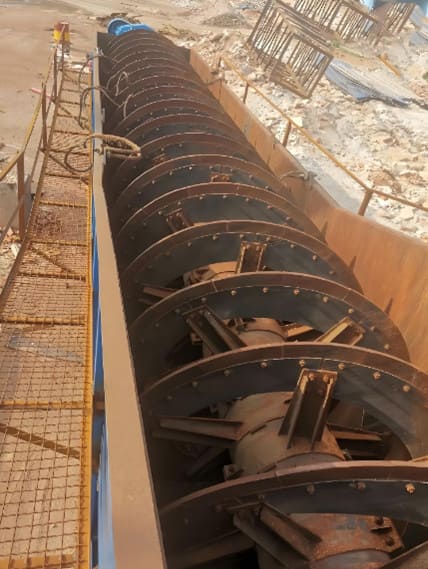
How it Works: A spiral blade rotates inside a trough, lifting sand while water jets remove impurities. The clean sand is discharged while the dirty water flows out separately.
Características
- Higher washing efficiency than wheel washers
- Longer washing time improves purity
- Can handle clay-heavy sand
Aplicações
- Mining, river sand cleaning
- Heavy-duty washing (e.g., crushed stone, silica sand)
Precautions for Sand Washer Installation
Sand washers are critical equipment in sand and gravel production lines, used for washing, desliming, and grading. Their installation quality directly affects operational efficiency and equipment lifespan. Below are detailed installation precautions:
1. Pre-Installation Preparations
Site Survey & Foundation Construction
- Ground Bearing Capacity: Ensure the installation foundation is solid and level (compaction degree ≥95%), with a bearing capacity exceeding 5 timesthe total equipment weight (including material load).
- Foundation Dimensions: Pour concrete foundations strictly according to manufacturer-provided drawings, reserving anchor bolt holes (vertical deviation ≤2mm/m).
- Drainage System: Plan drainage channels in advance to prevent water accumulation around the foundation.
Equipment Inspection
- Verify the spare parts list (e.g., screens, blades, bearing housings) for deformations or rust caused during transportation.
- Check motor and reducer nameplate parameters (power, speed) against design specifications.
2. Key Control Points During Installation
Main Frame Installation
- Adjust frame horizontality using a high-precision level (error ≤0.5mm/m); misalignment leads to uneven wear.
- Secure anchor bolts via secondary grouting, allowing ≥72 hrs curing (minimum C25 strength before tightening).
Transmission System Alignment
- Coupling alignmentbetween motor and reducer: Radial/axial deviation ≤0.1mm (laser alignment recommended).
- V-belt tension: Press midway—proper deflection = 10-15mm(over-tightening burns bearings; looseness causes slippage).
Water Line & Screen Installation
- Spray pipe angle: Nozzles tilted 15°-30°toward material flow; water pressure 3-0.5MPa.
- Screen tension: Use tension tools to ensure flatness (gap uniformity ≤2mm).
3. Post-Installation Testing & Acceptance
(1) No-Load Test Run (≥4 hrs)
Check:
- Bearing temperature rise ≤35℃(max ≤75℃).
- No excessive vibration (≤4.5mm/s).
- No leakage at seals.
- Load Test Run (Gradual Feeding)
Start at 30% of the designed capacity, scaling to 100%, monitoring:
- Washing efficiency (mud content ≤3%).
- Throughput (e.g., validate output for a 50t/h model).
- Documentação
Keep installation records, test reports, and manufacturer approvals for warranty claims.
4. Common Installation Mistakes & Solutions
| Questão | Consequence | Solução |
| Unleveled foundation | Bearing misalignment wear | Shim adjustment + secondary grouting |
| Loose screens | Inefficient grading | Utilização 304 stainless screens, periodic tension checks |
| Water pipe leaks | Water waste, slurry splashing | Add rubber gaskets + Teflon tape |
5. Precauções de segurança
Lifting: Use cranes with ≥1.25× equipment weight capacity; protect wire ropes from sharp edges.
Electrical Safety: Motor grounding resistance ≤4Ω; control cabinet IP55+ (dust/waterproof).
Warning Signs: Install guards and labels near rotating parts (e.g., pulleys).
Tip: On-site guidance by manufacturer technicians is recommended. Custom installations may be needed for harsh conditions (e.g., freezing/corrosive environments). Weekly bolt checks can extend lifespan by 30%+.
After completing meticulous installation procedures, attention turns to preparing your sand washer for its first operation. While the installation forms the equipment’s structural foundation, thorough pre-start inspections ensure its functional readiness—both equally vital for long-term operational success.
Consistent performance begins with disciplined routines. The following pre-start inspection protocol serves as your frontline defense against operational failures, systematically verifying every critical component before committing to full production capacity.
Pre-Start Inspection Checklist for Sand Washers
Before starting a sand washer, a comprehensive inspection must be conducted to ensure safe operation, prolong equipment lifespan, and enhance productivity. Below are the key inspection items:
1. Safety Checks
Surrounding Environment
- Ensure the area around the sand washer is free of obstructions (rocks, tools, waste, etc.).
- Check for dry and water-free conditions to prevent electrical shorts or slipping hazards.
Protective Devices
- Inspect guards covering moving parts (belts, rollers, spiral blades).
- Verify emergency stop button functionality.
2. Mechanical Structure Inspection
Bolts & Fasteners
- Check anchor bolts, bearing housing bolts, and connecting boltsfor tightness (re-tighten after 48 hours for new installations).
- Screen/Filtration Plate: Ensure no damage or looseness to prevent material leakage or clogging.
Lubrificação
- Bearing Grease: Add lubricant as per manual (typically every 8 hours).
- Gearbox Oil Level: Check if lubricant (gear oil, e.g., HLP220) is within the marked range.
Water Spray System
- Are the nozzles clogged? Is water pressure adequate (recommended: 0.3–0.5 MPa)?
- Inspect hoses for leaks or damage.
3. Electrical System Inspection
Motor
- Ensure cables have intact insulation and secure connections.
- Manually rotate the motor (power off) to confirm no jamming.
- Three-phase voltage stability (±5%)and current within the rated range (see nameplate).
Control Panel
- Check circuit breakers and contactors for normal operation (no burn marks).
- Ensure all emergency stop switches are reset.
4. No-Load Trial Run (Critical Step!)
Before Starting
- Clear personnel from hazardous zones.
- Start-up sequence: Water spray system → Main motor.
Observe Operation
- Any abnormal vibration/noise (e.g., metal grinding may indicate bearing failure)?
- Are belts/chains aligned correctly? Proper tension maintained?
- Do motor/bearing temperatures stabilize (<60°C within 10 min)?
Post-Shutdown Inspection
- Re-tighten critical bolts.
- Troubleshoot issues identified during trial before full production.
5. Special Condition Checks (Harsh Environments)
Cold Weather
- Use low-temperature grease (e.g., lithium-based).
- Warm up the machine via idle run (~5 min) before operation.
High-Dust Conditions
- Verify motor cooling fans are unobstructed to prevent overheating.
6. Emergency Actions
Immediately Shut Down If:
- Severe vibrations/knocking sounds
- Smoke/burning odor (electrical fault)
- Bearing temperature >75°C (possible lubrication failure)
Recommendation: Post-operation cleaning (e.g., residual sand removal) minimizes downtime!
Conclusão
Mastering sand washer installation and startup protocols delivers measurable benefits—reducing wear by up to 30%, preventing unplanned outages, and maintaining consistent output quality. Remember: the extra time invested in precise alignment checks, systematic lubrication, and gradual load testing pays exponential dividends in equipment longevity. For specialized configurations or persistent operational challenges, always consult your manufacturer’s technical team. Implement these practices consistently, and your sand washing operation will achieve new levels of reliability and efficiency.
PRODUTOS MAIS RECENTES
-

Cyclosizer
【Feeding Capacity】< 100g/time 【Feeding …
-
JKZ/2JKZ Mine Shaft Sinking Hoist
【Power Source】Electric Motor Drive 【Motor Spee…
-
JK(B)/2JK(B) Mine Hoisting Winch
【Capacity】 6-17 Tons 【Drum Number】1-2 【…


