We should pay attention to the use of the new electronic belt scale. Many cases will lead the belt scale to large measurement errors. Such as the parameter settings are not complete, the default parameters are different from the actual situation, it doesn’t set the zero point according to the actual weight of the belt, and it doesn’t carry out the calibration before use. Therefore, we must debug and recover it to the correct accuracy range before use. What problems should be paid attention to when debugging the electronic belt scale?
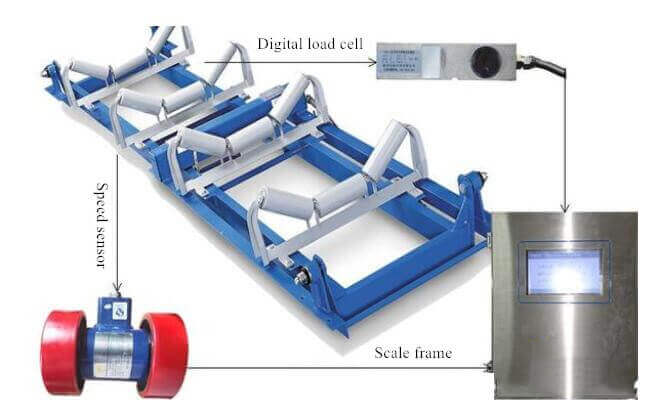
We must confirm the correctness of the wiring and then continue the operation as follows:
Press the menu key on the instrument three times. In menu three, diagnosis, the instrument will monitor and display the two-way weighing sensor input (D AD value) and the 11-way speed input (frequency value).
Note: When the scale is empty, your sensor may be too small if the D AD value is too large (over 20000). If it is D 1000AD, which indicates that the sensor is too large or the wiring is wrong, there is no signal. If it is D 65535AD, the wire connection is wrong, or the weighing sensor is damaged.
The second line is the speed pulse. When the belt is open, it cannot be 0.
The Debugging of Belt Scales
Establish the belt cycle (Make the empty belt run at the maximum speed)
Before entering the data, please measure the circumference data of the belt accurately, which is required to be correct. Run the belt conveyor idle at the maximum speed, draw a mark on the belt, and calculate the time it takes for the mark to rotate three times. If the running time is less than 180 seconds, let the belt continue to run and rotate, until the number of rotations is> 3 and the running time is> 180S.
Press Menu 2→Calibrate Data→Scroll down to Establish Test Cycle→Manual→Enter the belt length (the actual belt circumference should be accurate)→Press Continue→Enter the number of turns (must be bigger than 3)→Press Continue→Enter the time (should be bigger than 180 seconds) → press start → wait for the time to count down → press return, the belt cycle is established at this time, and displayed speed is the current running speed.
Zero calibration (remove belt weight)
Press Menu 1→Zero Calibration→Press Start→Time Countdown Stop→Change→Run*For the first time use of this operation, please calibrate it three times in succession, and for subsequent daily use, please perform zero-point calibration frequently or once a day. If the zero point error value is unstable or it can’t find the zero point after multiple zero point calibrations, please check the following items:
- Whether the weighing sensor is connected correctly
- Whether the weighing idler has connected with the conveyor frame, friction, and other factors.
- Check the belt and the weighing idler to see whether the connection is effective.
- Check whether the idler rotates normally.
● Physical Calibration
First, prepare something with the exact weight, such as balancing weight, or multiple bags of different materials, first weigh the weight of each bag with a bench scale, and calculate the total weight.
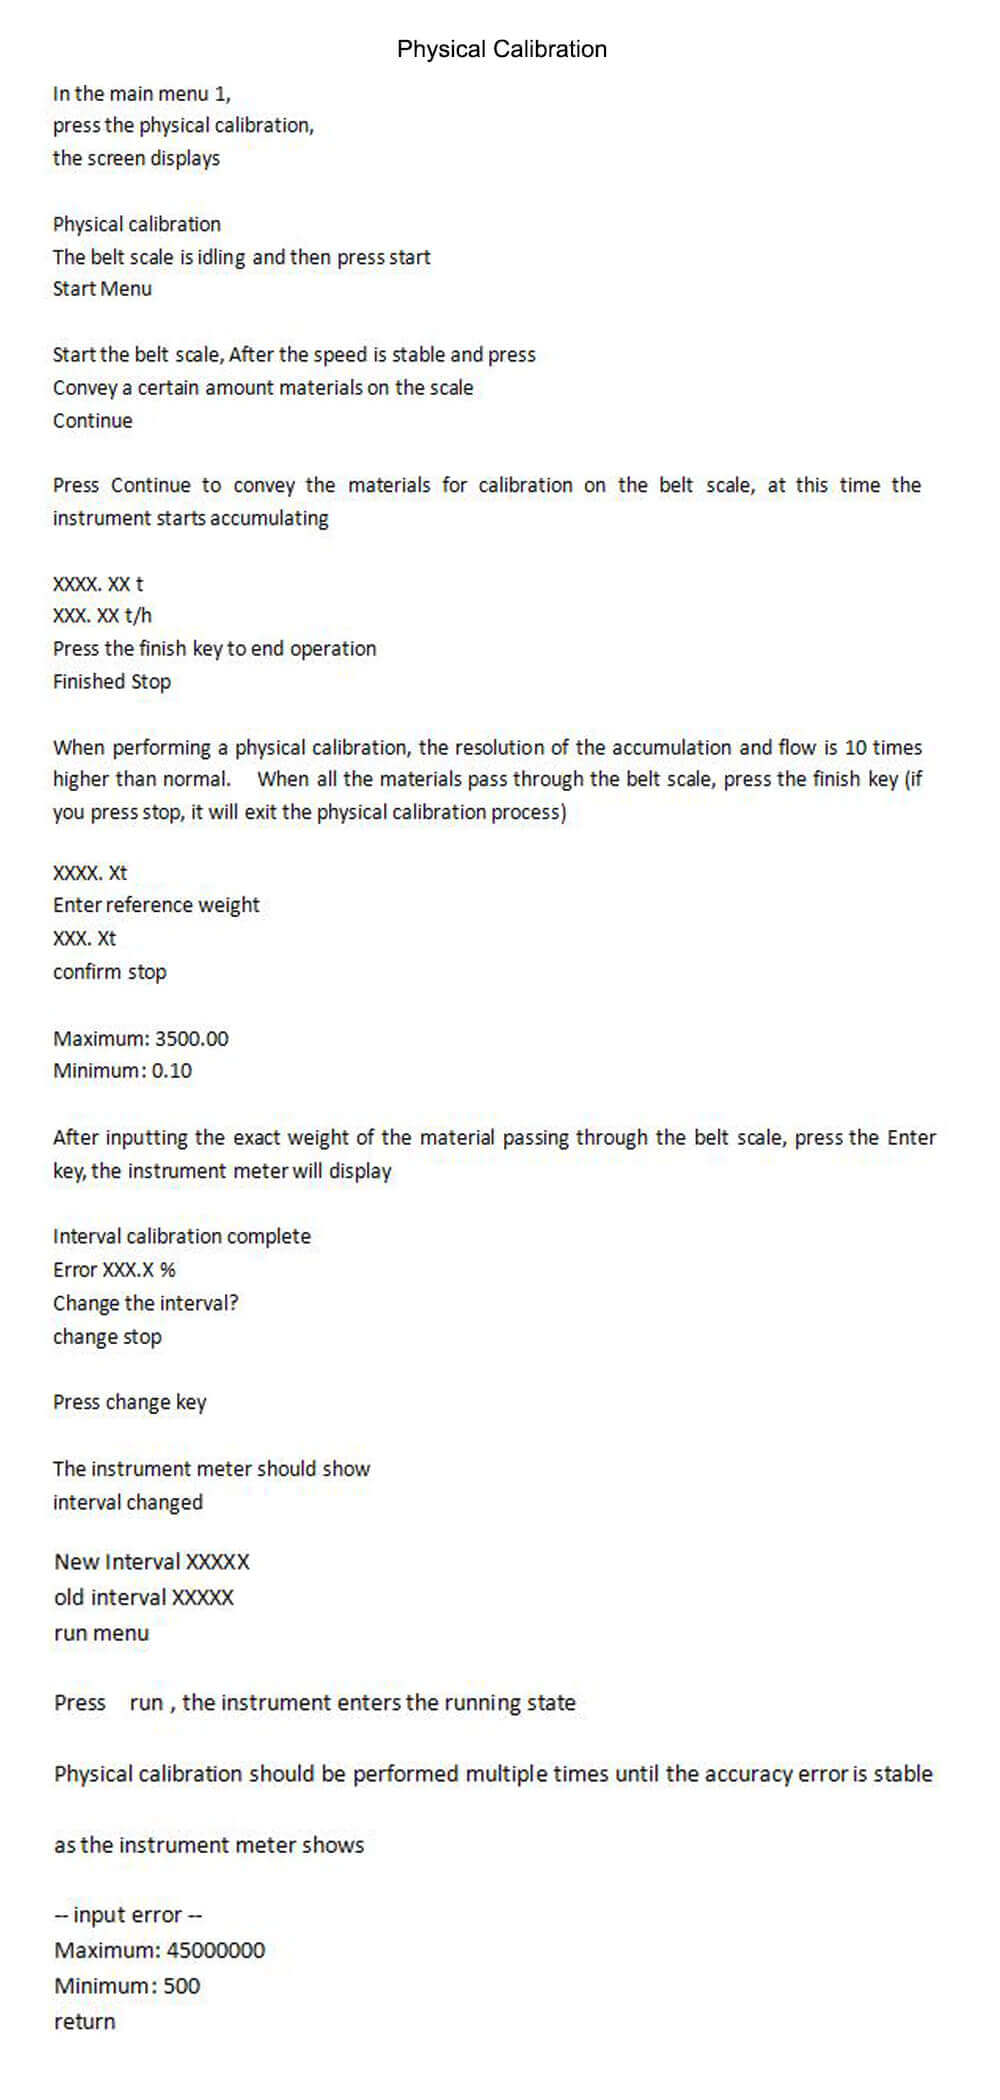
- In the main menu 1, press the physical calibration, and the screen displays ”Physical calibration”.
- The belt scale is idling and then press “Start Menu”.
- Start the belt scale after the speed is stable and press, convey a certain amount of materials on the scale.
- Press “Continue” to convey the materials for calibration on the belt scale. At this time, the instrument starts accumulating: XXXX. XX t, XXX. XX t/h.
- Press the “finish” key to an end operation.
- Finished Stop
When performing a physical calibration, the resolution of the accumulation and flow is ten times higher than usual. When all the materials pass through the belt scale, press the finished key (if you press stop, it will exit the physical calibration process).
Please check whether the input parameters are correct and consult the engineer if necessary.
The key formula of the belt scale: in the menu, two interval calibrations, press Manual, and there is an interval value. It can change this interval value manually. Specific Formula: new interval value=(actual weight/display weight)*old interval value or new interval value=(1±error to be adjusted)*old interval interval value.
For example, if we increase 0.5% of the overfeed amount displayed by the meter, at this time, the new interval value=1.005*old interval value. For example, if we reduce 0.5% of the overfeed amount shown by the instrument, the new interval value = 0.995 * the old interval value.
If field conditions do not allow physical calibration, please refer to the following chain and chain code calibration.
At this point, the installation and debugging of the belt scale are over. To make the latter work freer of worry, please copy down the belt cycle value, zero value, and interval value.
● Calibration Data
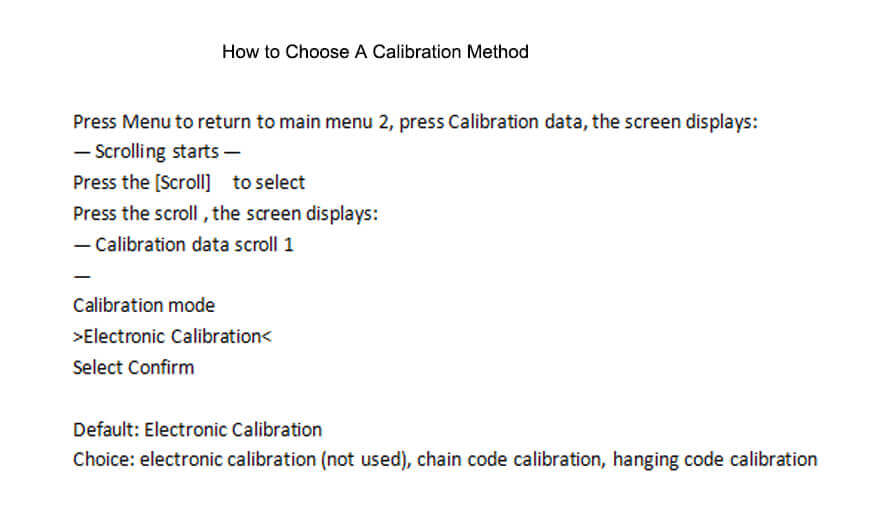
1. Choose a calibration method
Select the calibration method you need(chain code or hanging code), and press the Enter key to confirm.
This operation is to confirm the calibration method of automatic interval calibration later. If chain code is used, select chain code and chain code mode for hanging code.
This value is input after automatic calculation by the meter. You can check whether the value is consistent after calculation according to the formula. If they are inconsistent, check the belt scale model, idler interval, belt length, and hanging weight in the scale data.
The calculation method calibration constants are as follows.
Calibration Constant Calculation
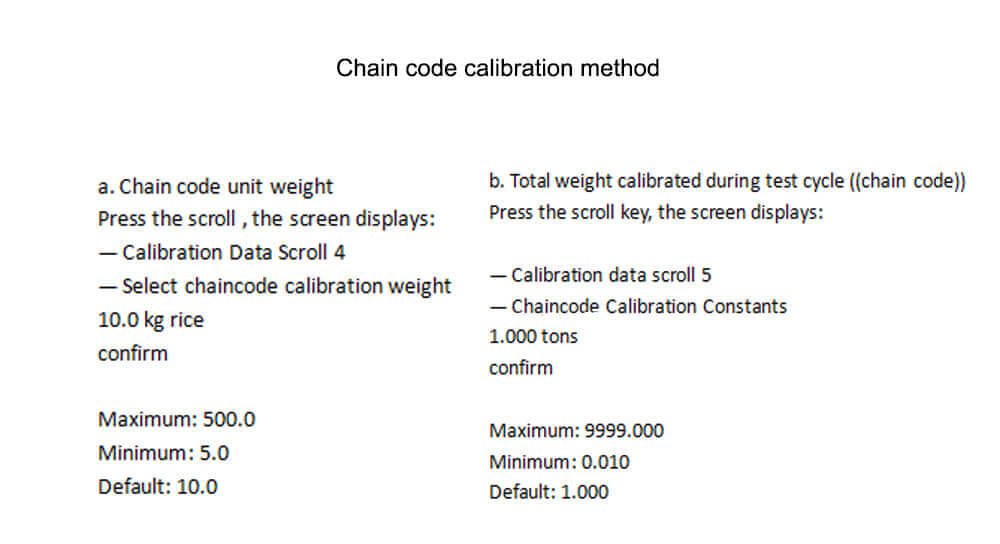
The calibration chain code determines the equivalent belt load (kg/m). Kg/m is the actual weight of the calibration chain code.
Chain Code Calibration Constant = (kg/m) * Test Cycle Belt Length (Lt) / 1000
Example: Test cycle belt length = 180 meters
kg/m = 30
Chain code calibration constant 30*180/1000=5.4 tons
2. Calibration method of registration code
Hanging weight
Press the scroll key, and the screen displays:
— Calibration data scrolling 6
— Select the calibration weight for the code
10 kg
confirm
Maximum: 2000
Minimum: 5
Default: 10
The total weight of the calibration during the test cycle ( (Changing code) )
Press the scroll, the screen displays:
— Calibration Data Scroll 7
—Code Calibration Constants
1.000 tons
confirm
Maximum: 9999.000
Minimum: 0.010
Default: 1.000
This value is input after automatic calculation by the instrument meter. You can check whether the value is consistent after calculation according to the formula.
The calculation method calibration constants are as:
(1) Equivalent load of registered code
Kilogram/meter (kg/m) = hanging weight (kg)/ length of measuring section (D)
Hanging weight = static weight applied to the weighing roller
Example: Kg = 100
D = 2.4 meters
kg/m= 100/2.4= 41.67 KG/M
(2) Hanging code calibration constant
Hanging code calibration constant = kg / m * test cycle belt length (Lt) / 1000
Example; Lt= 180m
Hanging code calibration constant=41.67*180/1000=7.5 tons
● Interval Calibration
After the zero point calibration and calibration data are set, press menu to return to the main menu 1, press the interval calibration, and the screen displays
— XX calibration interval
–start belt
Press the start button again
start exit manual
Interval calibration can use three different analog load calibration methods: electronic calibration (not used), hanging code calibration, chain code calibration,
The instrument meter is calibrated according to the calibration method and calibration constant selected in the calibration data.
If you choose the hanging code or chain code calibration mode, add the simulated load (the hanging code is hung in the middle of the two sets of idlers of the belt scale, and the chain code is centered on the belt) and then start the belt scale. (The weight of the hanging code needs to be input again in this step during the hanging code calibration) Press the start key, the indicator will display.
Automatic interval calibration
Time remaining XXX
XXX.X tons/hour
During automatic interval calibration, the meter resolution is 10 times higher than normal. When the remaining time is 0, the screen displays
Auto interval calibration complete
Error XXX.X %
Change interval?
change stop
If you need to change the interval, press change, the screen will display
interval changed
New Interval XXXXX
old interval XXXXX
run menu
as the instrument meter shows
— input error —
Maximum: 68000000
Minimum: 70000
return
Please check whether the input parameters are correct and consult the engineer if necessary.
The electronic belt scale is a relatively common dynamic continuous accumulation automatic weighing scale for materials. The actual use accuracy of the electronic belt scale must not be compared with that of the static scale. Moreover, the long-term continuous material transportation will inevitably affect the long-term stability and accuracy of its measurement. Therefore, in order to make good use of the belt scale, it is necessary not only to purchase well, but also to use correct installation and debugging, and long-term maintenance.
LATEST PRODUCTS
Tubular Screw Conveyor
【Capacity】6-50 m3/h【Procesible Material】 …
Heavy Plate Feeder
Capacity: 100-240 m3/h Power: 15-45 kW Speed: 0…
Plate Magnetic Separator
【Capacity】8-35 t/h 【Power】1.5-3 kW 【Applic…


